After a long discussion about what I was proposing to do the Australian agent for Raptor polymer nails, brads and staples suggested that their 12mm (actually 1/2") long 15G nails would do the job. I was a bit sceptical because there would only be 7mm of nail holding the 5mm ply in place. He was confident enough to send me the gun without payment and for me to return it if it didn't work!
Here is the new tool before firing the first nail. It is a nice piece of work made in Italy.
Some testing on the bench showed that I needed to back off the depth control on the gun as far as it would go so that the nails weren't punched almost through the plywood. Once that was done I went back to testing on the boat. The next two photos show a couple of strips in place with the heads still below the surface.
In the nearer strip I put in two nails but in the second strip there is only one
except at the bottom where I put in two (the first three missed the frame!).
There's a gap between the two strips because they are parallel. When they are fitted finally the second strip has to be trimmed to fit the one that it buts up against.
At this point I turned down the air pressure at the regulator and found that I
can control the depth reasonably well. The heads can be buried a bit on the
first two layers of ply because the depressions will get filled with epoxy. In
the third layer the depressions would be a pain - they would need filling or the
hull would be covered in dimples.
The frame is pine and pretty soft so I
wondered what would happen with the second and third layers of ply where the
nails will encounter more resistance. More testing with scraps of ply and
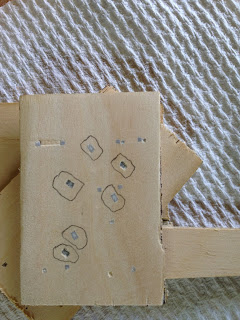
various air pressure gave me this result. Backing off the air pressure a bit
left the heads sticking up a bit above the surface. The photo shows three that
went in too far and three that have been sanded back.
I'm happy with this result and can now get on with the last jobs on the frame before I pick up the sheets of ply early next week and start building the hull.
I realised that it is probably best not to build the stringers into the hull at this stage. Putting the fibreglass cloth inside the hull will be more difficult if the stringers are in place already. So I will take them out and put them in a safe place ready to be glued on top of the fibreglass - at least they will fit. Once these stringers are removed I will need to put in a couple more ribbands to support the planking at the bilges.
Last job will be to cover the frame with plastic tape so the hull doesn't get glued to the frame where it shouldn't.
This blog describes in words and pictures the building of a Paul Gartside designed fantail launch. There are a number of fantail launches of various sizes on the Paul Gartside website at http://store.gartsideboats.com/collections/steam-launches.
My boat will look like his 20 foot steam launch but will be 18 feet long and will be powered by a small diesel or petrol engine or possibly an electric motor. I have built a rowing boat, one and a half sailing boats and a small canoe and so this will be something different.
If you would like to contact me please click to send me an email.


No comments:
Post a Comment